Categories
2020 is certainly a year that we will forever remember. The COVID-19 pandemic has forced us all to flex and develop our 21st Century Skills (communication, collaboration, critical thinking, and creativity) in order to reinvent our way of life and stay connected to our community. Faced with these challenges, local artist Cara McKinley has worked with PPLD’s Creative Services staff to completely reinvent and rebuild the annual Maker in Residence Program (MIR), adapting it to meet social-distancing needs.
Explore Fall Maker in Residence Create Together: Community Build to learn about the collaborative art project!
Classes
In place of in-person classes, Cara has created skill-based project videos that introduce the viewer to traditional clay ceramic and assemblage skills using non-traditional, sustainable materials readily available at home. We encourage you to follow along with the projects using your own materials, so we’ve provided a suggested supply list with each video so that you can participate at your own convenience.
Recognizing the value of direct interaction, we also scheduled several MIR Live Chats to provide community members with an opportunity to chat with Cara and ask her questions about the videos and her art style, connect with other community members, and show off their finished pieces.
- Clay Dig
- Clay Dig part one: A quick tutorial on how to find and dig clay, overviewing what properties or characteristics to look for when digging, with conscientious and ethical dig considerations included.
- Clay Dig part two: Using the locally-sourced clay from part one, learn to create a small pinched object, and get a sneak peek into the Community Build projects that you'll find at PPLD Libraries across the Pikes Peak region!
- Supplies: backyard clay (or air dry clay), plastic knife, plastic fork, pencil or pen
- Optional: water cup, paint brush, inspiration foliage (leaves and flowers to press into the clay), pigment (tempera, acrylic, latex, glitter, etc.)
- Sand Sculpture
- Sand Sculptures part one: Using a tinfoil sculpted form as the base, this sandsculpting method of faux concrete sculpture incorporates glue, dirt, and pigment found in the home to coat the tinfoil form. See what other objects and materials can be added to create visual interest.
- Supplies: Elmer's Glue (all purpose), dirt/sand from your yard (play sand works too), tinfoil, mixing cup, parchment paper
- Optional: paint (latex, acrylic, or spray)
- Sand Sculptures part two: For the sandcasting technique, use sand, glue, plastic, and different types of color such as food coloring or acrylic paint to create a one-part mold casting. Make and pour your own mixture into your favorite shapes in a form made from sand! Create one, two, or ten... you're the artist!
- Supplies: Elmer's Glue (all purpose), dirt/sand from your yard (play sand works too), shallow container (or box lid), recycled plastic, parchment paper, fibrous string (yarn, rope, fabric strips), old brush or mixing stick, mixing cup, food coloring or pigment (watercolor paint, tempera), permanent marker
- Optional: glitter, rhinestones, sequins, other found additions, tinfoil
- Sand Sculptures part one: Using a tinfoil sculpted form as the base, this sandsculpting method of faux concrete sculpture incorporates glue, dirt, and pigment found in the home to coat the tinfoil form. See what other objects and materials can be added to create visual interest.
- Plastic Reboot
- Plastic Reboot: Using simple and complex building methods, along with previous techniques (introduced in Clay Dig & Sand Sculptures), learn to reshape plastic using scissors, a nail file, and connection styles (maybe even some packaging tape). The everyday bottle is transformed into a treasure that catches light using rethought objects from your surroundings.
- Supplies: plastic (found or collected), scissors, permanent marker
- Optional: packaging tape (clear), nail file, pliers, drill XACTO, glue pigment mixture (or nail polish), wire, glitter, rhinestones, sequins, tinfoil, additional found objects
- Plastic Reboot: Using simple and complex building methods, along with previous techniques (introduced in Clay Dig & Sand Sculptures), learn to reshape plastic using scissors, a nail file, and connection styles (maybe even some packaging tape). The everyday bottle is transformed into a treasure that catches light using rethought objects from your surroundings.
- Maker Challenges
Maker in Residence Cara McKinley wants you to pick a challenge from this video to complete in just an hour! Watch the video for inspiration prompts such as...- Make a tree ornament that you would want to live in if you were a bird
- Make an instrument as tall and as wide as your body out of household objects and materials
Watch the video to find more creative challenges!
- Assembled Objects
Here’s your chance to get a brief look at Cara McKinley’s studio while she explains why she enjoys working with natural and recycled materials and explains the importance of assembling objects to make art.
The Maker
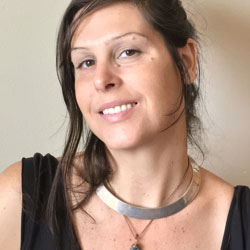
 A transplanted surfer from South Florida, Cara has always been enthralled in looking at the natural world. After completing her Post Baccalaureate Studies at Indiana University Bloomington and Master of Fine Arts in Ceramics at the University of Tennessee in Knoxville, Cara moved to the rocky terrain of Colorado to recreate her observations in clay and multimedia. Using video, sculpture, installation and assemblage allows her the opportunity to indulge in the essence of an object and her world to create a shared reality. She makes in variable spaces in a continuous process of play using traditional and non-traditional media. Household objects, found items and natural materials such as sticks, sand, clay, tinfoil, metal, and glass express a way to enjoy and pay homage to nature.
The results are in! The Betty Field Youth Memorial Writing Contest, sponsored by the Friends of Pikes Peak Library District, is writing contest for youth in grades 6-12 that focuses on mystery stories. This year, 90 students submitted stories to the contest. These submissions were judged anonymously by volunteers from the Friends of the Library and Pikes Peak Library District staff, who entered over 400 scores for the stories!
6th Grade:
- 1st place: "Pluto Found Missing" by Madalynn Moorhead
- 2nd place: "Friend or Foe?" by Tristan Kumar
- 3rd place: "The Girl Erased from Time" by Hudson Sheperd
7th Grade:
- 1st place: "Scootered" by Jace Baehman
- 2nd place: "The Dissociative Killer" by Raina Seybert
- 3rd place: "The Case of the Cullinan Diamond" Daniel Bloomfield
8th Grade:
- 1st place: "Buried Memories" by Isabelle McNett
- 2nd place: "A Walk in the Woods" by Marian Griffiths
- 3rd place: "A Hole in the Roof" by Cannon Lockburner
9th and 10th Grade:
- 1st place: "Provocation" by Elaine Zou
- 2nd place: "Blue Girls and Zombie Kits" by Riley Ferl
- 3rd place: "The Ridge" by Angel Jimenez
11th and 12th Grade:
- 1st place: "The Puppetmaster" by Sierra Montgomery
- 2nd place: "Mystery of the Missing Happiness" by Evelyn Peake
- 3rd place: "An Odious Case" by Christian Alvis
Winners will be contacted via email with information about their prizes.
Supplies:
- Tall, clear glass cylinder vase or container (preferably straight)
- Food coloring
- Measuring cup
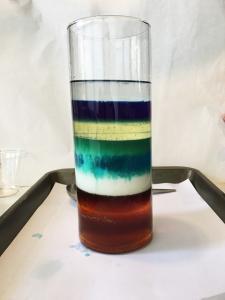
- Order of liquids needed for this density "burrito" (but you could do less liquid choices, but make sure to start with a heavy liquid and end with the lightest liquid):
- Honey
- Corn Syrup (add a couple drops of food coloring)
- Maple Syrup
- Whole Milk
- Dish Soap
- Water (add a couple drops of food coloring)
- Vegetable Oil (add a couple drops of food coloring)
- Rubbing Alcohol (add a couple drops of food coloring)
- Lamp Oil (DO NOT add food coloring to this liquid - it's doesn't mix in.)
- Tray
- Turkey Baster
- Items to sink or float: ping-pong ball, plastic beads, metal bolt, grape or cherry tomato, etc.
Directions:
- Determine how many ounces your container holds with room to spare at the top. Round up or down to a number that can easily be divided your number of liquid layers. Measure the exact amount of liquid ingredients into separate containers. (My large container held about 32 oz. leaving room at the top, so I divided 32 by 9, and then rounded the number down to a 1/3 c. of each liquid to make it easy to measure. Have a grown-up help you, especially with the lamp oil.)
- Place the large container on the tray.
- Add the liquids IN ORDER (they go from most dense to least dense).
- Starting with the honey, pour it very slowly so that it doesn't touch the sides of the container.
- Next, very slowly, dribble the corn syrup on top of the honey. Don't let it touch the sides of the container either.
- Again like the first two, slowly dribble the maple syrup into the container on top of the corn syrup.
- Using the turkey baster, add the milk very slowly. Now it helps to pour the liquids slowly down the sides of the container as you add them. You will add the next five liquids in the same manner.
- When all the liquids are in place. Add items and watch them sink or float or get stuck, depending on their weight and the density of the liquid where it stops.
Watch this project at: https://youtu.be/QjEYa6xBVRQ?list=PLMEg2Dd0dSFctLfDQxsL5SmuE8zkwQFmu


